Showing posts with label Medieval. Show all posts

Tuesday 12 December 2023

Skulferatu #110 - Bastion 14, London City Wall, Barbican, London


Travelling down to Kent, I found I had an unexpected day out and overnight stay in central London due to a train strike. So, what to do? Well, I did what I always do and went for a walk. After a foray around the banks of the Thames I cut up past Saint Paul’s and towards the Barbican. There, amongst an array of buildings from Brutalist concrete to glass and steel I spotted a ruin, sitting in a little oasis of green, just by the entrance to an underground carpark.


A photo showing a ruined red brick building (Bastion 14) with a road running down past it.  A huge office block (Bastion House) towers over the building.  Photo by Kevin Nosferatu for the Skulferatu Project.
The ruins of Bastion 14 sitting by the 1970s Bastion House


A view down a road to a grey concrete underground carpark. On the left hand side is a concrete bridge and in the distance an office block of glass and steel.  On the right hand side in a fenced off area with the ruins of the red brick walls of Bastion 14 sitting in it.  Photo by Kevin Nosferatu for the Skulferatu Project.
Bastion 14 with concrete and glass buildings towering above it


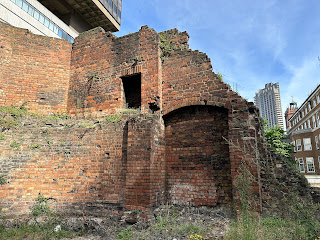
Making my way down to it, I found that it was the remains of a fort that formed part of the old City Wall of London. This Medieval wall was built on the foundations of the old Roman wall around the city, and the fort, or Bastion 14 to give it its official title, was one of the 21 bastions built along it. 


A photo of the ruins of Bastion 14 that face out towards the road.  It shows a ruin of red bricks with an arched area on the right hand side and a doorway near to the top of the building.  The sky above is blue and in the distance can be seen a grey concrete London tower block.  Photo by Kevin Nosferatu for the Skulferatu Project.
Bastion 14


The original city wall was built by the Romans around 200AD as a defensive wall around Londinium. After the collapse of the Roman Empire, it fell into decay. In medieval times the need for a defensive wall was once again called for, and large sections of the wall were repaired and rebuilt. Then, in the 17th century London expanded rapidly and the wall was seen as no longer necessary, so much of it was demolished.


Tourist Info Map at site, showing the course of the City Wall


When the city wall fell out of use, many of the bastions were incorporated into other buildings, with Bastion 14 at one time being used as part of a warehouse.


During the Second World War the area around Bastion 14 was flattened by bombing and the buildings encasing it were destroyed. The Bastion was then identified as a historic structure and was saved from demolition. However, the 1970s office block towering above it, Bastion House, doesn’t appear to be so lucky, as it is now earmarked for demolition. Shame, as it’s so ugly that I quite like it.


A photo looking up with the ruined wall of Bastion 14 at the bottom which then seems to be joined by the towering building of Bastion House above.  This is a dark grey building with row after row of dark windows in it.  Photo by Kevin Nosferatu for the Skulferatu Project.
The walls of Bastion 14 with Bastion House towering above


Another view of Bastion House - looking up at it so it towers into the distant sky.   Photo by Kevin Nosferatu for the Skulferatu Project.
Bastion House


I had the whole garden area to myself as I wandered the old wall and Bastion 14. As the sun warmed my old bones, insects buzzed around me, and two crows kept an eye on me as they skipped and hopped around the grass lawn looking for insects.


A photo showing an old wall leading down to the ruin of a fort like tower.  They sit in a grassy area with modern office blocks sitting in the distance.   Photo by Kevin Nosferatu for the Skulferatu Project.
The old City Wall and Bastion 14


A view of some dried seed heads of plants in the garden that sits in front of Bastion 14.  Photo by Kevin Nosferatu for the Skulferatu Project.
Dried husks and seed heads


A view of Bastion 14 with the old wall leading up to it on the left side of the photo.  On the right is a garden of dried seed heads and husks.  Photo by Kevin Nosferatu for the Skulferatu Project.
Bastion 14 with glass and concrete buildings all around


A photo of the low tower of Bastion 14 jammed in at one side by the old city wall and at the other by the Bastion House building.  Photo by Kevin Nosferatu for the Skulferatu Project.
Bastion 14


While walking along a path through a small garden area of dried husks and seed heads, I saw a gap in the old brickwork by the wall beside the Bastion. There I left the Skulferatu that had accompanied me.


A photo of a hand holding up a small ceramic skull (Skulferatu #110) with Bastion 14 in the background.  Photo by Kevin Nosferatu for the Skulferatu Project.
Skulferatu #110


A photo of part of the city wall sitting next to Bastion 14.  In the wall there is an arch that has been almost blocked with stone.  Photo by Kevin Nosferatu for the Skulferatu Project.
Old wall beside Bastion 14


A photo of a small ceramic skull (Skulferatu #110) sitting on a red brick and crumbling cement.  Photo by Kevin Nosferatu for the Skulferatu Project.
Skulferatu #110 in a gap in the wall beside Bastion 14


A photo of a small ceramic skull (Skulferatu #110) sitting on a red brick and crumbling cement.  Photo by Kevin Nosferatu for the Skulferatu Project.
Skulferatu #110 in a gap in the wall beside Bastion 14


TomTom Map showing location of Skulferatu #110
Map showing location of Skulferatu #110


The coordinates for the location of the Skulferatu are –


Latitude 51.517828

Longitude -0.095148


what3words: bars.wider.teach


I used the following sources for information on Bastion 14 –


Tourist Information boards at the site
 

Museum of London Archaeology


Tuesday 28 June 2022

Skulferatu #74 - The Beheading Stone, Mote Hill, Stirling


On a hill, not far from Stirling Castle there is a strange little monument.  It looks like an iron cage sitting on a stone pedestal with a lump of rock locked in under the bars.  This is the Beheading Stone.


A photo of the Beheading Stone in Stirling. It is a large grey stone that is sitting on a round stone plinth and it is enclosed in an iron cage.  There is a plaque on the front that reads - Protected by the public at the instance of the Stirling Natural History and Archaeological Society 1887.  Photograph by Kevin Nosferatu for the Skulferatu Project.
The Beheading Stone


The Beheading Stone was the traditional execution block in Medieval Stirling.  It sat, as it does now, on Mote Hill which was the place ‘of assembly, of judgement, and of execution in days of yore.’  It is thought that the stone was used to support a wooden block, and that the condemned man would place his chest on the stone and his head on the block.  The executioner would then use his axe to lop of the doomed man’s head.


A view on the top of Mote Hill with two old style black cannons in the foreground and the Beheading Stone in the background.  Photograph by Kevin Nosferatu for the Skulferatu Project.
A couple of cannons and the Beheading Stone on Mote Hill


In 1425 Murdoch Stewart, the Duke of Albany was executed here along with two of his sons and his father in law.  Stewart had served as Governor of Scotland while the future King James I was held captive in England.  After a rather large ransom had been paid for his release, James returned to Scotland.  Shortly after being crowned, James decided to consolidate his power and get rid of all those who may be a threat to him.  At the top of this list of potential threats was Murdoch Stewart.  On the King’s command he was arrested for treason along with several members of his family and a host of other members of the Scottish nobility.  A trial then took place against Murdoch Stewart, his two sons and his father in law, over which the King sat as the Judge.  Not surprisingly all were found guilty of treason.  They were then quickly marched down to Mote Hill and beheaded.  All their lands and properties were then forfeited to the Crown, so as well as getting rid of any potential threats to his rule, this was a nice little earner for James.


All of this made James quite an unpopular King and soon a group of scheming nobles decided it was time for him to go and for Walter Stewart, the Earl of Atholl to take the throne. Amongst this group of conspirators was one of the many nobles who had at one time been imprisoned by James, Sir Robert Graham.


On the night of 20 February 1437, King James and his Queen were staying in Blackfriars Monastery in Perth.  A group of around thirty men, with Sir Robert Graham at their head were let into the monastery by one of the King’s servants.  They made their way to his chambers where they stabbed him to death, with Graham administering the fatal blow.  The Queen, who had been wounded trying to protect her husband managed to escape.  She quickly took on the role of Regent for her young son James and then ordered the execution of all those involved in the killing of her husband.  It wasn’t long before many of those who had been involved in the assassination were captured, and in April of that year Graham was apprehended and taken to Stirling.  There he was tortured horribly over a period of three days before finally being beheaded on Mote Hill, with the old Beheading Stone playing its part in his execution.


The Beheading Stone was mounted on a plinth and enclosed in a cage of iron bars in 1887.  The money for this being raised by the Stirling Natural History and Archaeological Society through public subscription.


A view of the beheading Stone looking out over to the Wallace Monument.  Photograph by Kevin Nosferatu for the Skulferatu Project.
The Beheading Stone and view over Stirling to Wallace Monument


An old sepia photograph showing the view from Mote Hill in 1897 with the Beheading Stone in the foreground looking out over to the Wallace Monument - taken from the Merchants Guide to Stirling and District
View from Mote Hill in 1897 - from the Merchants Guide to Stirling and District


A view of the Wallace Monument, a large, square sided tower with a steep sloped roof, on a hill in Stirling with a mountain in the background.  Photograph by Kevin Nosferatu for the Skulferatu Project.
View of the Wallace Monument from Mote Hill


Mote Hill is now quite a sedate place and near to the Beheading Stone are some benches to sit on, take in the view over Stirling, and quietly contemplate life, the universe and anything else worth pondering on.


I left the Skulferatu that accompanied me on my walk today in a hollow in the Beheading Stone.


A photo of a small, ceramic skull (Skulferatu 74) being held up with the Beheading Stone in the background.  Photograph by Kevin Nosferatu for the Skulferatu Project.
Skulferatu #74


A photo of a small, ceramic skull (Skulferatu 74) lying in a hollow in the Beheading Stone on Mote Hill in Stirling.  In the background are the iron bars of the cage in which the stone is kept in.  Photograph by Kevin Nosferatu for the Skulferatu Project.
Skulferatu #74 on hollow in the Beheading Stone


A photo of a small, ceramic skull (Skulferatu 74) lying in a hollow in the Beheading Stone on Mote Hill in Stirling. Photograph by Kevin Nosferatu for the Skulferatu Project.
Skulferatu #74 on hollow in the Beheading Stone


Google Map showing the location of Skulferatu #74


The coordinates for the location of the Skulferatu are –


Latitude 56.127709

Longitude -3.942775


I used the following sources for information on the Beheading Stone –


The Merchant’s Guide to Stirling and District

1897


The Illustrated London News, September 22, 1906


Information Notices at the site


Wikipedia

Wikipedia - Sir Robert Graham


Corpus of Middle English Prose and Verse

The dethe of James Kynge of Scotis

Tuesday 30 November 2021

Skulferatu #51 - The Multangular Tower, Museum Gardens, York


It was my last day in York and having an hour to kill before catching the train home I went for a walk through the Museum Gardens.  There, not far from the entrance stands the Multangular Tower.


A picture of a large and angular old tower that was part of the Roman fortress of Eboracum, now central York.  Photo by Kevin Nosferatu for the Skulferatu Project.
The Multangular Tower


The Multangular Tower is a defensive tower that was part of the Roman fortress of Eboracum.  It stood at the western corner of the fortress and is the last surviving one of eight similar towers that stood along the fortress wall.  The tower got its name from it having ten sides.


The tower and the surviving part of the original fortress wall were incorporated into the defences of Medieval York.  The top three metres of the tower and wall were added in the Thirteenth Century when the fortifications around the city were strengthened   The original Roman parts of the tower date from around the third Century.


A picture of the interior walls of the Multangular Tower.  At the foot of the tower is grass and a few old, stone coffins dating from Roman times.  Photo by Kevin Nosferatu for the Skulferatu Project.
Interior of the Multangular Tower


Old stone walls at the rear of Multangular Tower, leading down to the ruins of the tower.  Photo by Kevin Nosferatu for the Skulferatu Project.


A picture of very old, stone walls standing at rear of the Multangular Tower.  In the distance are the red brick buildings of York and also one of the Minster's towers.  Photo by Kevin Nosferatu for the Skulferatu Project.
Walls at rear of Multangular Tower


There is some debate on who originally had the tower and walls constructed, as in whether it was the Emperor Septimius Severus who had his headquarters in York between AD 208 and 211, or Constantine the Great, who was proclaimed Emperor of Rome while in York in AD 306.  We’ll probably never know, but I think everyone can agree that they are bloody ancient, having stood on this spot for around one thousand eight hundred years or so.  The things they must have seen…oh, if only walls could talk.


I left the Skulferatu that accompanied me on my stroll around the Museum Gardens, in a gap in the medieval wall around the back of the tower.


A picture of a hand holding a small, ceramic skull, Skulferatu #51, with an old, stone wall in the background.  Photo by Kevin Nosferatu for the Skulferatu Project.
Skulferatu #51


A picture of a small, ceramic Skull, Skulferatu #51, in a gap in the medieval wall near the Multangular Tower in the Museum Gardens in York.  Photo by Kevin Nosferatu for the Skulferatu Project.
Skulferatu #51 in a gap in the wall


A close up picture of a small, ceramic Skull, Skulferatu #51, in a gap in the medieval wall near the Multangular Tower in the Museum Gardens in York.  Photo by Kevin Nosferatu for the Skulferatu Project.
Skulferatu #51 in a gap in the wall


Google Map showing location of Skulferatu #51 by the Multangular Tower in the Museum Gardens in York.
Map showing location of Skulferatu #51


The coordinates for the location of the Skulferatu are –


Latitude 53.961702

Longitude -1.086668


I used the following sources for information on the Multangular Tower –


Historic England – Multangular Tower and Wall Attached to South East

Historic England - Multangular Tower and Wall attached to South East


York Museum Gardens

The Multangular Tower - York Museum Gardens


Information board on the tower walls